
Choosing a Stabilizer: The difference between “just right” and Awesome!
Possibly the number one question we receive from enthusiasts who purchase our files for home embroidery is the “why is it looking like this?” question. While, the stabilizer is the least visible portion of our work to our customers, as embroiderers we understand that it is the foundation upon which each stitch is laid, and just like a building: one foundation is not the same for every terrain… or um, garment.
For the purpose of our examples we will sew out two designs using the same file, on the same material: this ensures that only the stabilizer is the difference so we have a just comparison.
Right or Wrong?
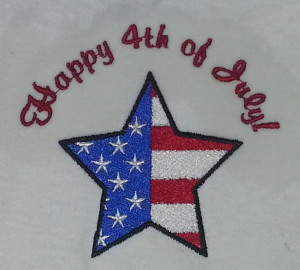
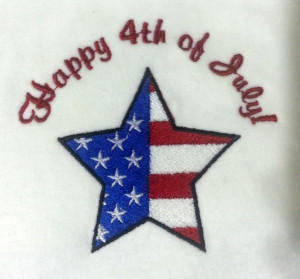
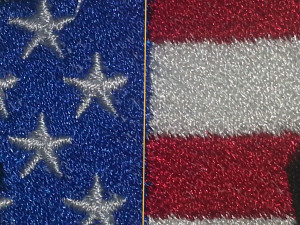
The following picture on the Left were taken of a correctly hooped and stabilized version of our design. The photo on the Right was made on the same material but was stabilized improperly. This is not to say that no stabilized was used, but that either the type or amount was not utilized. For this example we choose a material that is somewhat common, and is causing the most problems from the emails we have been receiving: a Jersey knit T-shirt: the standard for left chest designs everywhere. Both are the same machine, our trusty Toyota 860, same thread; only the stabilizer or lack there of is different.
On first glance they may not seem dissimilar. but take a closer look:

On the left hand above photo, we properly stabilized with 2 layers of underlay, specifically Madiera’s cut away 2 oz stabilizer as well as a top coat stabilizer, Madiera soluble in 1 oz, all the backing and fabric was hooped together and sewn with Madeira’s polyester 40 weight thread. More often than not we hear that this seems excessive, or that it is too much work to do these multiple layer stabilized sew-outs.
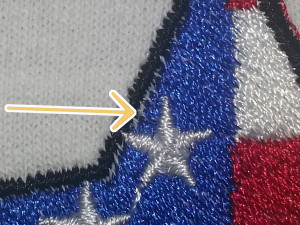
We have found that is far more work and effort to redo a bad sew-out; more costly as well if you consider that customers can’t recognize our extra 5 seconds of prep work, but instantly recognize if that lack of effort produces an undesirable finished product. On the right, we see what a lack of prep or improper selection produces: jagged outlines, missed stitches and ill proportioned fill areas that are pulled and pushed out of alignment.
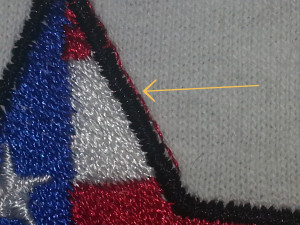
Causing an put of square wave
Stabilizer selection:
The start to choosing your stabilizer begins with an understanding of density. Density is a measure of how many stitches are called for by the design file to fill a one inch by one inch area of the design, they are the ‘pixels’ by which sew-outs are measured. They are similar to megapixels in a digital camera: more is better until you reach a point of diminishing return. Too dense and the material may become too bulky and stiff; too little and the underlying material may show through, creating a loose and cheap appearance: think any polo you may have ever seen at a discount store or dollar shop. Other primary considerations are the type of design you will be sewing out.
Embroidery Design Types:
Fills:

Fills are the bread and butter of the logo embroiderer. Fills are solid areas of tightly placed
stitches making solid colored sections often outlined by satin stitch boarders. Filled designs have the highest stitch counts, and naturally the highest densities. These designs require a relatively high amount of stabilization to prevent the fill from pushing, or distorting, the boundaries of the satin stitch borders. I find the best sew-outs are made on wearable garments (polo, knits piques, performance wear) when we use a total of 3 backing materials layered. Two layers of cut-away backing sandwiching a single layer of cap tear-away (crisp hard tear-away). All of this goes beneath the garment, no soluble on top is necessary for most applications.
This method is very often the best, rather than sewing on a garment with a single heavier stabilizer. Sandwiched stabilizing sheets each have their own fibrous “grain”, and two sheets of cutaway and one tear-away in the middle layer offer more support; it allows the “grains” to be placed in different directions, giving more stability than a single thicker sheet can possibly allow. This is the same reason builders use multiple layers of fiberglass, it’s not the thickness that gives strength, it’s the bi-lateral support nature that gives us a solid foundation.
Now often it is said “if you wear it don’t tear it” meaning to not use tear-away on clothing that will be worn. Generally that is true: however as I explained earlier, we use the tear-away only on heavy filled designs and place it between the cutaway to prevent the wearer getting scratched from any hard tear-away that may remain. Cutaway is gentler on the wearer’s skin especially after its first washing.
Applique:
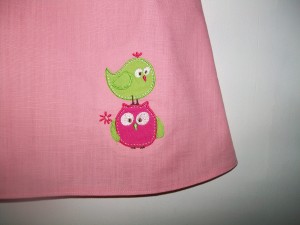
Applique is most often created with structured Satin Stitch borders or Blanket stitch (also known as an “E-Stitch”) borders on top of running stitch outlines, sandwiching the applique material between the two stitch types. The satin stitches mark boundaries for the applique cut outs, and they also act to hold down the applique, bordering and masking the edge. Machine embroidery applique with a blanket stitch edge is a difficult method to do as it requires an exact cut applique fill. The edge is an open type stitch, meaning that the tack down running stitch outlines must be removed, or at least hidden. We will be covering the specifics of applique in a separate article, hopefully, soon!
As for the backing type, applique overall uses far less stitching than a full fill design, and as such the backing can often be lighter too, so long as the design is stable enough to ensure the borders are not distorted. One layer of medium cutaway or soft cutaway will suffice for most common applique uses; like cotton skirts or lighter blouses.
Sketches or Toile Type:
Sketches, and toile type embroidery create a style that produces embroidery that is similar to scrimshaw on etched bone; it is an elaborate line drawing style. These designs generally require a light stabilization, and a lightweight cutaway stabilizer often works well here.
Redwork Designs:

Redwork designs are the embroidery equivalent of simple line drawings, traditionally they were done by hand in red tread (thus the name), and were a traditional starting point when teaching hand embroidery. Good stabilization is needed to prevent the pulling and puckering of the stitches. Stitches in these designs are often longer than our average
running stitches, usually set to the machines maximum length. As these are most often found on linens and terry cloth kitchen towels and other non-wearable items, a good light weight tear away is preferable and seems to work well in most cases. If your using terry cloth or something that can let the stitch sink in, be sure to use a top soluble again, and make sure your thread is a good quality colorfast embroidery thread.
Combination designs may include any of the above; feel free to experiment, but remember tear away is itchy on skin even after a wash, so try to use cutaway to protect the skin if you can.
Well, ok… What do I USE then for what????
Ok, we always have options and the amount of them is daunting. The most commonly used stabilizer in the pro shops I have managed is 2 oz of cut away, non-soluble. It’s a great starting point as it gets 70% of the jobs done right off the bat. Works well in layers on a variety of industrial hoops, and even home hoops seem to work fine with one layer, usually 2 with no problems. If you can find a sample pack, as most companies that make and sell stabilizer has one, then you will be in good shape. To learn the nuances of your own hoops and machine, and not break the bank, samples are a great way to experiment. We use Madeira brand stabilizers, for no other reason than our shop is literally a block from our Madeira outfit; our tear away is a generic that is found online through Ebay in several huge rolls. It is generic and it works every bit as well as the more expensive stuff.
For those of us who are home embroiders or just starting out, Sulky is a good alternative and the one we see most often at the local craft suppliers. I will not say that any one brand is better than another; some are easier to dissolve with a spray bottle rather than having to wash it, and some tear away is stronger than others, some cut away washes out softer than others.
I will state that volume production requires volume buying, so if you’re moving from hobby to business, plan ahead and be ready to find a supplier and a tax id. (More on gearing up another time perhaps…) If you cannot find the sample pack you want to try locally, they are also available online, often without having to fill out and sign up for an account with the supplier; “ask and you will receive” goes a long way with one time samples, and will last you longer than you may think if you’re conservative.
Basic Stabilizer categories:
Tear-Away:
Tear-away stabilizer is a paper-like stabilizer available in different weights and in different texture from very soft to very crisp. After you sew it out, simply give it a tough pull and it rips away from the stitches. It comes in different weights, we use 3 oz. hard tear-away most often on out caps and sometimes on our shirts as design may call for it.
A soft tear-away is great when you are embroidering on bags, towels, napkins basically things that you don’t wear, but will see the back of often. It is best to not have cutaway when you can see the backside often. Do not use only tear-away on clothing because they will be laundered often, and the longevity of the embroidery will fail due to the breakdown of the tear-away with each wash. The material is part “paper”, and as it dissolves slowly time and again it will cause the embroidery to curl and buckle: an overall poor appearance.
The cap tear-away used on hats is usually only need for structured caps and we use one layer. For unstructured caps, you may need two or even three layers, as unstructured can be very shifty and will require more backing dependent on the design. If the Cap has a cardboard backing some embroiderers use that and sew straight through it; I would not: if the cap gets washed, so does the cardboard, it melts away like your reputation. Cap designs must be digitized correctly for an effective outcome, they are NOT the same as flat/tubular embroidery patterns, especially true the more complex they become.
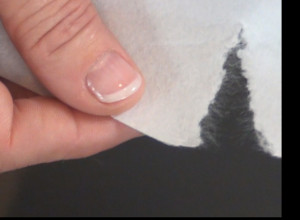
Cut-away:
Cut-away stabilizer is typically a non-woven stabilizer, but there are also nylon mesh and other types of woven stabilizers that are used as cutaway stabilizers. Cut away is needed when you really need to stabilize a shifty material and the application does not need a ton of small cuts, or you can cut one large circle around a design, like in a left chest polo design. These can add bulk, so only use it if necessary and lean toward the thinnest weight that can get the job done. Multiple layers are better than single heavy ones, and sandwiching a tear-away in between two cut-away layers will do wonders.
Soluble Stabilizer:
Solve, or Soluble stabilizer are wash-away stabilizers, they come in both mesh and a plastic form. These are often made of corn starch, and they wash away with water; often with just a spray bottle squirt of warm water. They are good for the top of knit type material or pique, where thread will naturally suck into of weave of the fabric. This includes fleece, knit, terry cloth, or jersey T-shirts as well. Soluble stabilizer builds up a thin protective layer between the fabric and the needle foot, giving you a smoother appearance and less push into the fabric. When using these fabrics, I find it is best to use ballpoint 75/10 needles, as the ballpoint will push the fabric aside instead of creating holes in the fabric. (another article perhaps…)
In all three categories, you will find sticky, fusible and non-fusible types.
We generally believe that fusible types, stabilizers that need heat, have no need to be in a machine embroidered application. Hoops do well in clamping the material, and if your hoop is too large for the design to get a tight backing and forefront you need to use either a smaller hoop that still allows the design size. Rule of thumb to always use the smallest hoop the design can use. If you can’t get it straight, consider a better hooping system that will make it all go together smoothly. Most shops, including myself, swear by the “Hoopmaster” because it works. Experiment with what works for you, but few if any professional shops will bother with fusing as a stabilizer as its added time. Heat is good for applique, not the stabilizer. Your hoop can hold a lot more than you may realize, but to each their own.
For those home embroiders that cannot hoop all the backing and garment together they often “float” their backing or garment. I strongly disagree with this method, as it can move and cause alignment issues as it is being sewn out.
That being said: if you cannot hoop it all together the best thing I’ve seen work in these cases is the “float” method:
- Fusible cutaway must be ironed onto the back of the fabric.
- Hoop two cutaway stabilizers onto your hoop by themselves.
- Lay the fabric/garment onto the hoop assembled and closed hoop:
Now here is the tricky part…
- As the fabric is laid onto the hoop which is holding the backing, pin the fabric to the backing using straight push pins:
Be sure to make it as taught and straight as you can.
- Now clip the fabric onto the hoop with hair clips or office spring binders.
If your machine allows for Basting Stitches, you should do so to further secure the garment to the underlying hoop/backing rig.
The biggest issue with the “float” method is that misalignment can easily occur; and at times puckering of the fabric may also occur.
So PLEASE, PLEASE, PLEASE! experiment with this method prior to any production runs, this is a last resort rather than a preferred production method, and should only be used as such.
Raising Machine Embroidery back to an Art!
Stabilizing properly is similarly as important as digitizing; they are both specific dependent on garment type and material. Improper selection of either will produce a poor sew-out, and a less than professional result. Stabilizers have a primary impact on the garments overall feel as well as the look of the embroidery, as stabilizer and backing adds a dimension of stiffness that may be undesirable to an otherwise loose, light, and easily moving/flexible garment. The goal is to use as light a stabilizer as possible to maintain as much of the original garment’s characteristic softness as possible, however there are tricks to getting the best out of even the most unruly fabrics. If you need help, I’m here and will be happy to answer any question you may have. Have an awesome sew-out.
You will need to experiment. It is always a good rule of thumb to run a sample on a spare fabric before you run your jobs to ensure the quality of the digitizing and stabilization is set.
Great write up on Stabalizer! Very informative….thanks
hello, I am new to the embroidery world and my question is, the cut away will it show threw the jersey or make that rounded bulky shape? I get so confused with this stabilizing stuff…Your article on backings is great I enjoyed reading it and found it very helpful. Thanks for taking the time to write it.
Sometimes things can get a little bulky and that’s ok; the embroidery will last longer as it won’t distort over time with many washes. It is a good idea to cut the back as close as you can to the edges of the embroidery to prevent it showing through and that bulky feeling as possible. It is always good to experiment as every material, and design that is being sewn out will have different results. As with anything the more you do it the better your prediction on what to use that will result in good embroidery.
thank you id like to download this to come back to it, how can that be done please? good info
I FIGURED IT OUT AFTER ALL and printed it too but did find the free 4th of july design but im really glad to print this so ill have it literally on hand thanks again
Very good. Would love to see you put together a video explaining this with examples.